
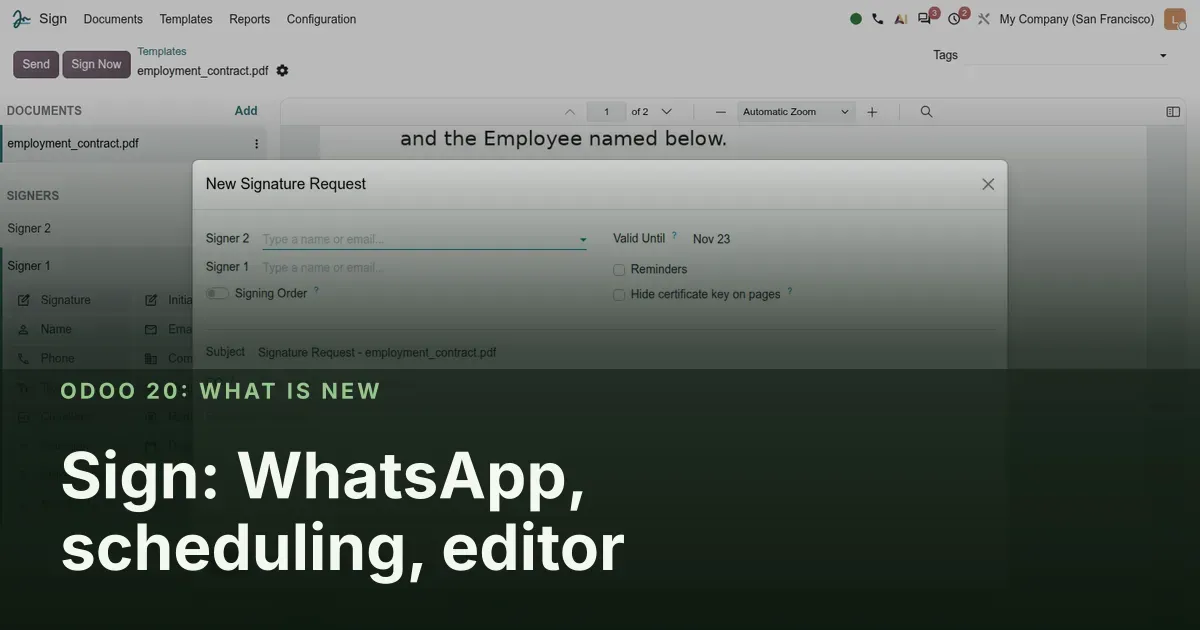
Faster signatures, from more places
Sign in Odoo 20 is about three things. Getting the request to the signer where they actually look, which for many candidates and customers is WhatsApp rather than email. Sending it at the right moment, with a Send Later option and a new Scheduled state. And preparing the template from wherever you are, with a sidebar that manages signers properly and a layout that works on a phone. HR teams sending offers, sales teams timing a contract send, and admin staff who care about the signing order will all find something they use daily.
On the pre-release build we uploaded a two-page employment contract, added a second signer, placed fields, reordered the signers and scheduled a request to two contacts. The sections below follow that flow. We could not capture the WhatsApp send button itself, because it only appears once Meta has approved the message templates; we show the setting that enables it instead.
Observed on the Odoo 20.0 Enterprise pre-release build of September 23, 2026. Names, menus and availability can change before general availability; we will update this page when they do.
WhatsApp joins email as a delivery channel
The most visible addition is WhatsApp as a way to deliver a signature request. If your company already runs the WhatsApp app in Odoo, a request can go out as a WhatsApp message instead of an email, with the same signing order and the same reminders as an email request. For a recruiter whose candidates answer WhatsApp within minutes and open email once a day, that is the difference between an offer signed on Tuesday and one chased on Friday.
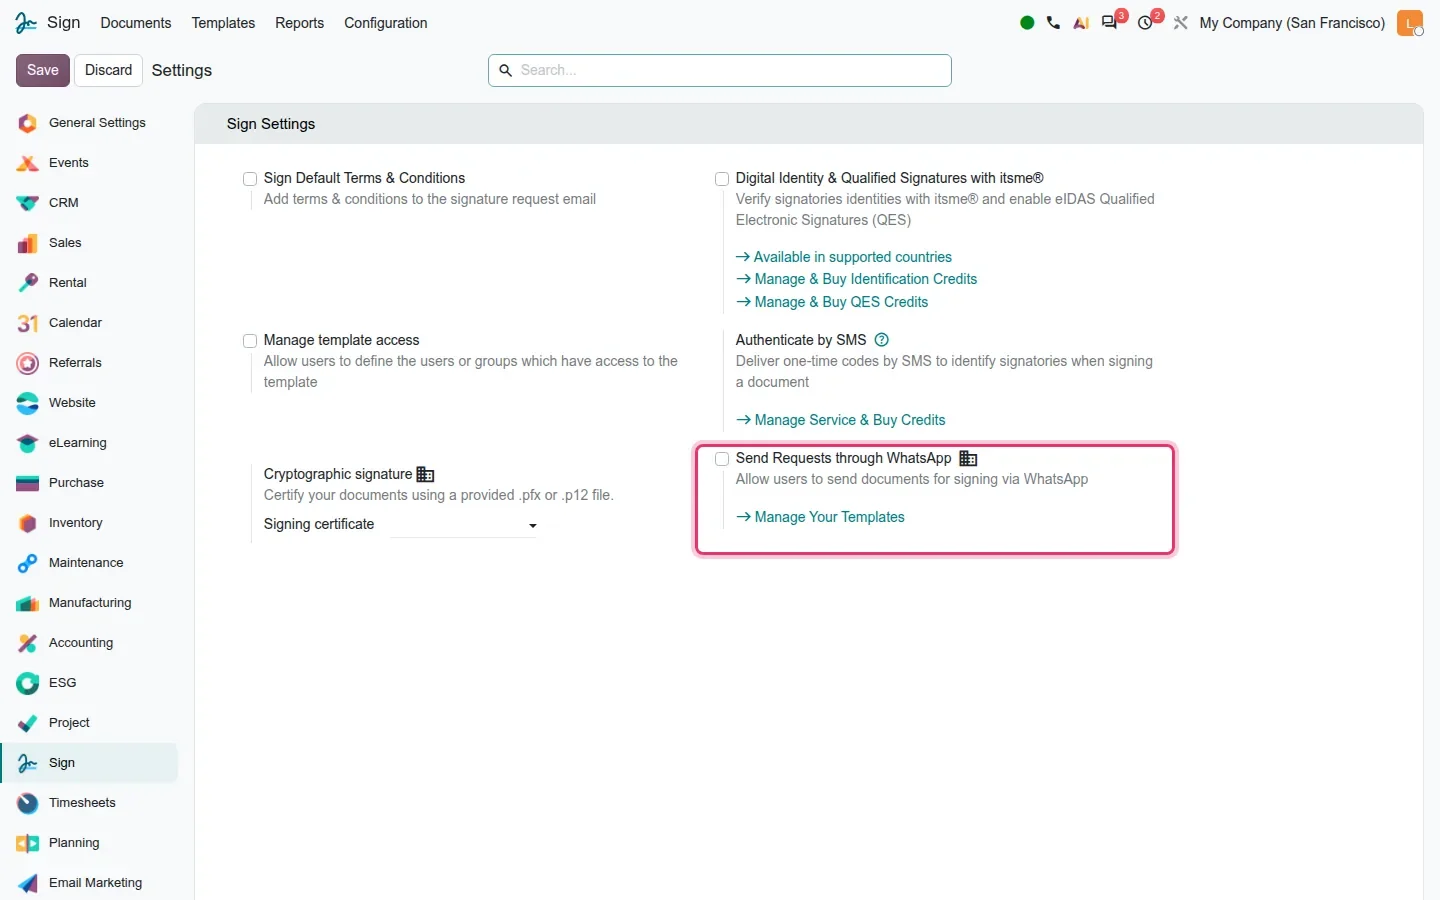
The switch lives in Sign > Configuration > Settings under Send Requests through WhatsApp. A Manage Your Templates link under it opens the WhatsApp message templates that Sign needs. On the pre-release build, the Send via WhatsApp button in the send flow only appears once the three Sign templates exist and Meta has approved them; our demo had no Meta Business account, so the option stayed hidden. Plan for that approval step, it happens on Meta's side and not in Odoo.
One caveat for companies that host Odoo themselves: the WhatsApp app depends on the phonenumbers Python package, which the 20.0 requirements.txt does not list. Without it, installing the app aborts the database initialisation. Odoo Online and Odoo.sh handle this for you.
Schedule a request from the send dialog
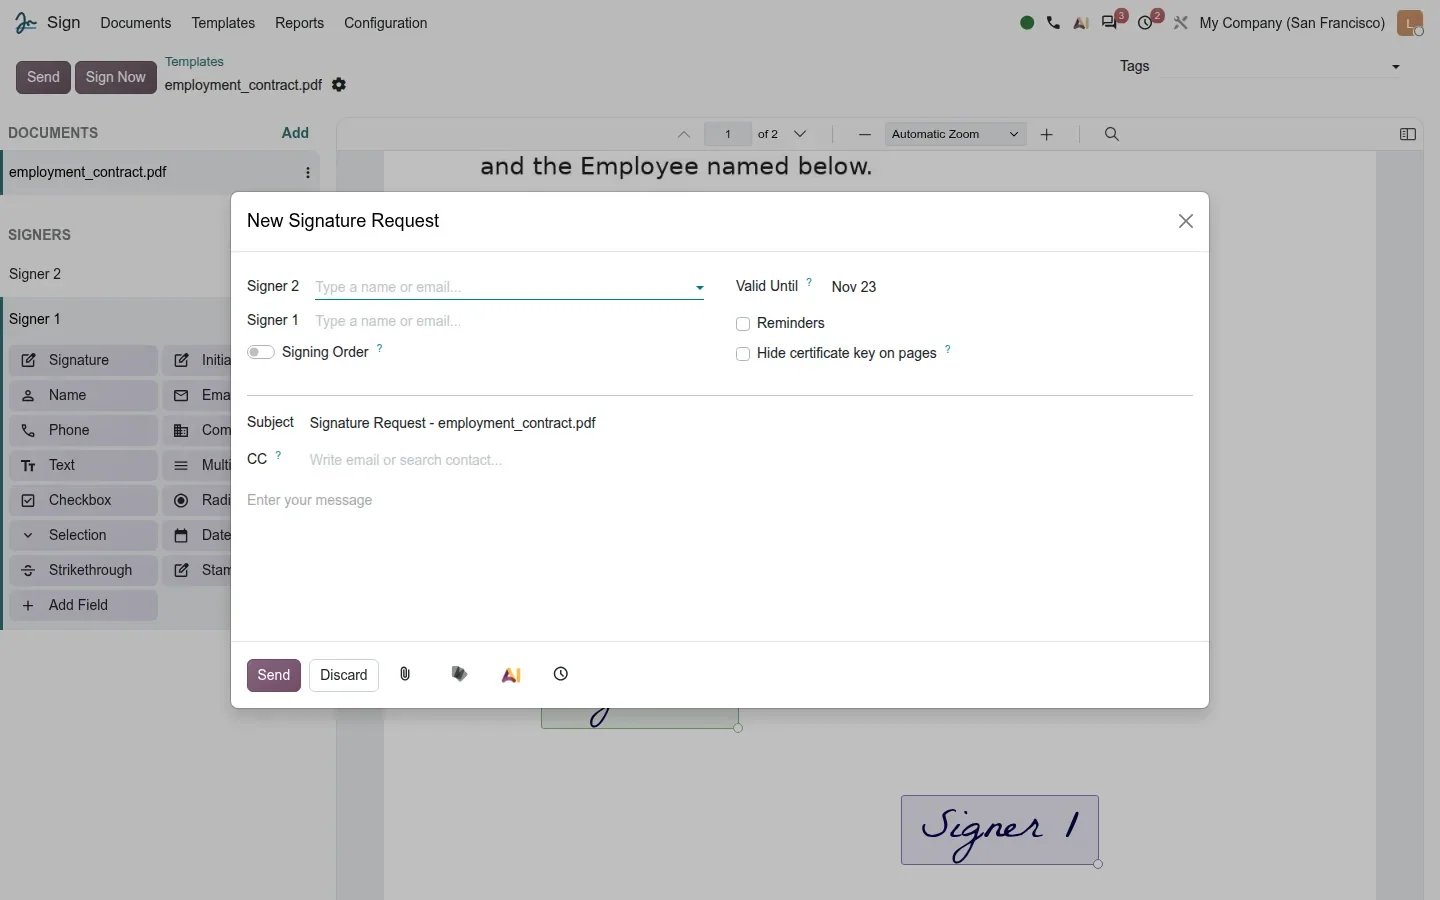
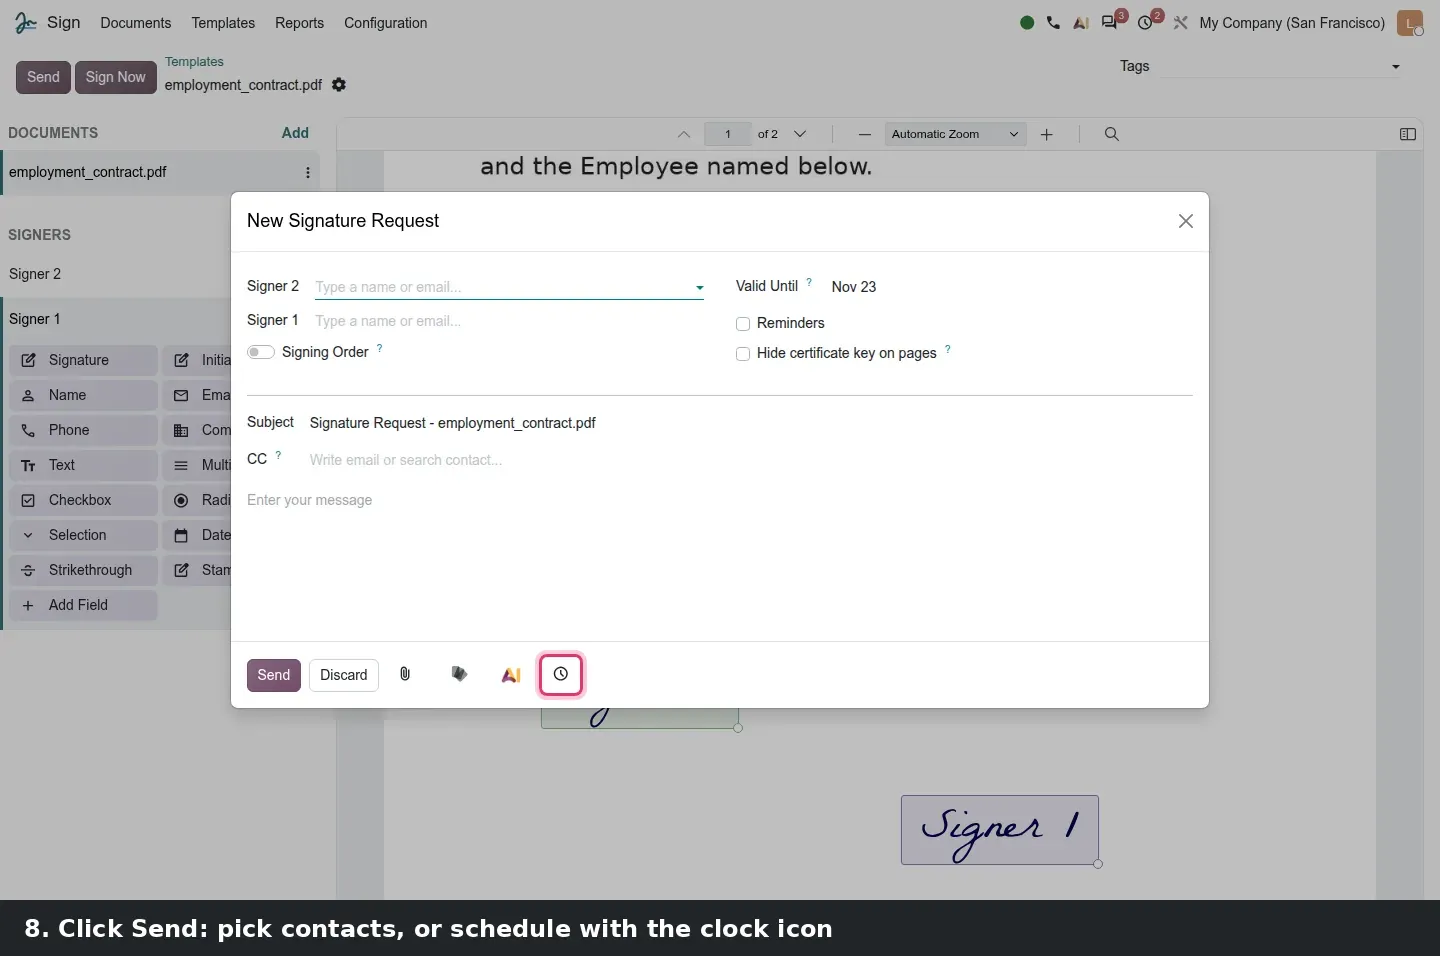
Clicking Send on a template opens the New Signature Request dialog: one contact line per signer role, a Signing Order toggle, Valid Until, Reminders, Hide Certificate Key on Pages, the subject, a CC line and the message. The footer holds Send, Discard, an attachment icon, a tag icon and a clock icon labelled Send Later. That clock is where scheduling starts.
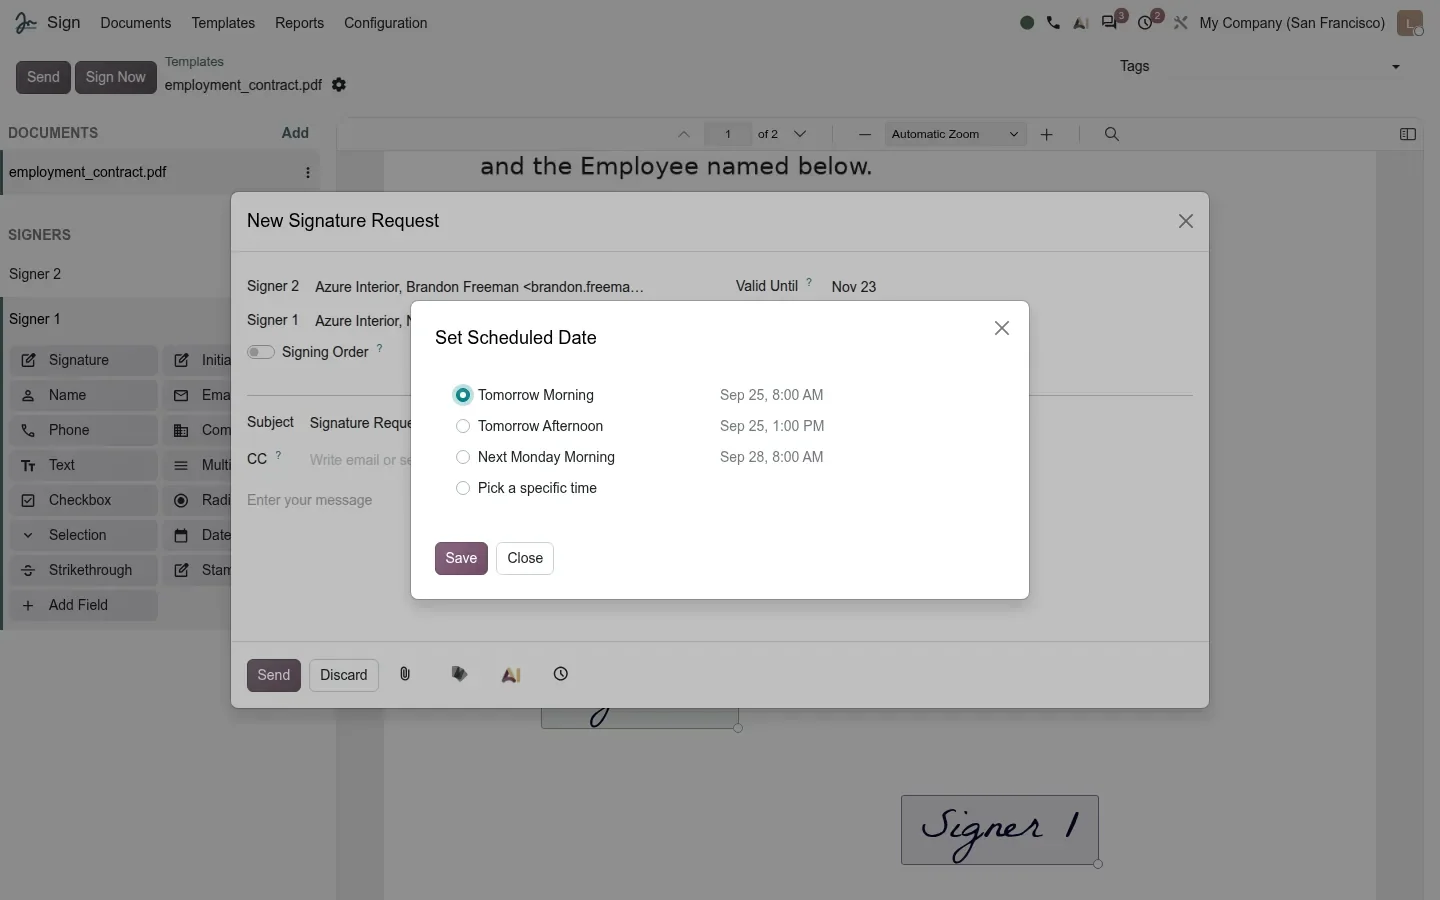
The clock opens a Set Scheduled Date dialog with four choices: Tomorrow Morning at 8:00 AM, Tomorrow Afternoon at 1:00 PM, Next Monday Morning, or Pick a Specific Time. Save, and the Send button turns into Schedule with the planned moment next to it, "Sending Sep 25, 8:00 AM" on our demo. The guide calls this a Scheduled Date field; on the build it is the clock icon and the Schedule button.
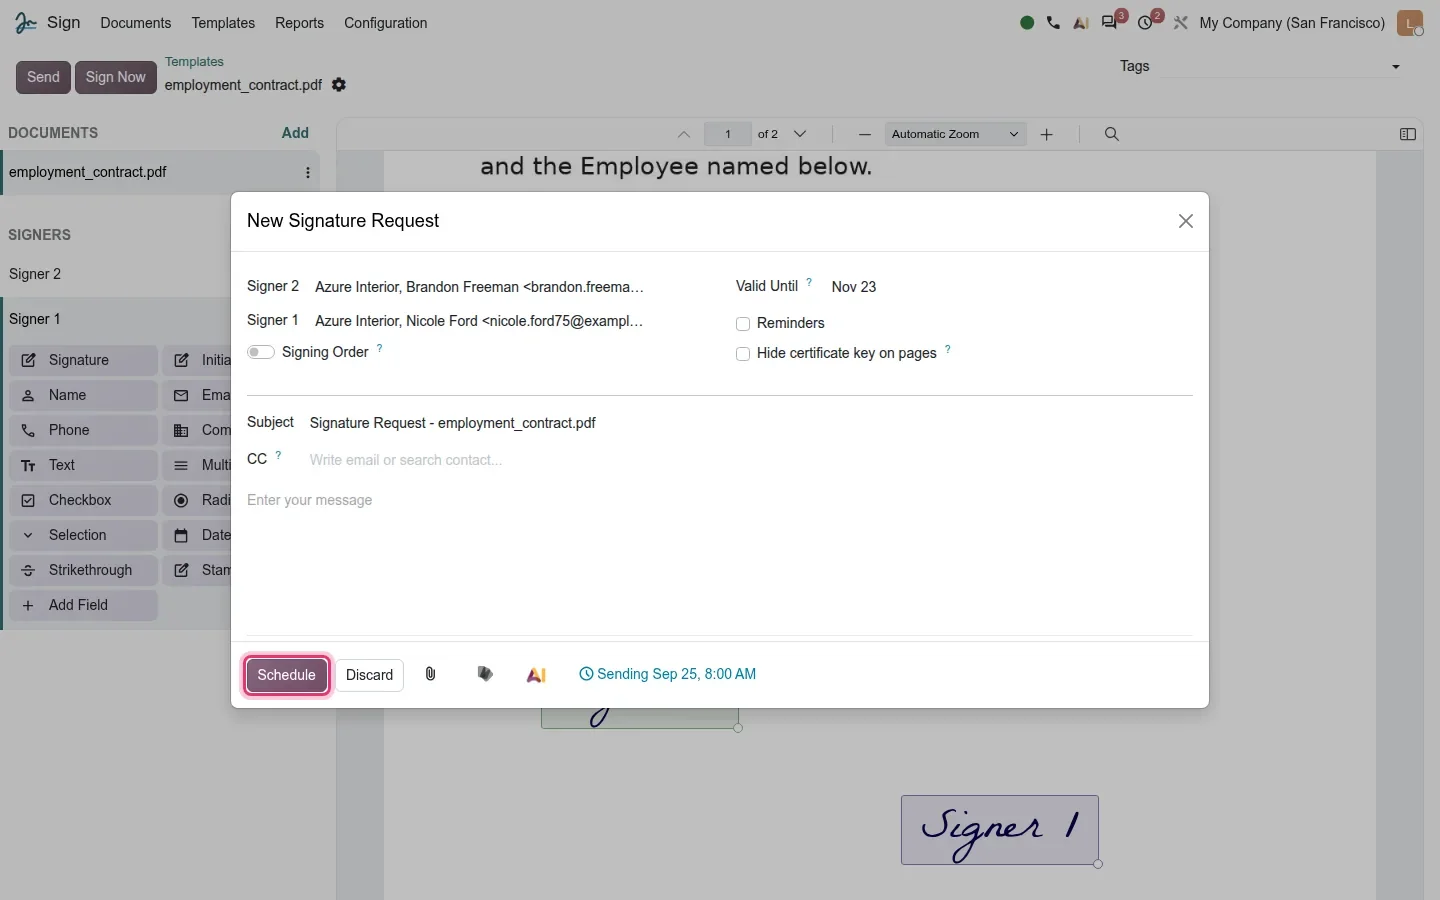
Behind the button, the request sits in a Scheduled state and a scheduled job moves it to To Sign once the date passes, sending the invitations at that moment. That covers the cases people used to handle with a calendar reminder: the contract that must go out on the first of the month, or the batch of offers you prepare on Friday evening but want signers to receive on Monday morning.
Before you click Schedule
Check Valid Until and Reminders in the same dialog before you schedule. Both travel with the request, so a document planned for three weeks out should carry an expiry and a reminder cadence that make sense from the day it is actually sent, not from the day you prepared it.
A Scheduled state in the document lifecycle
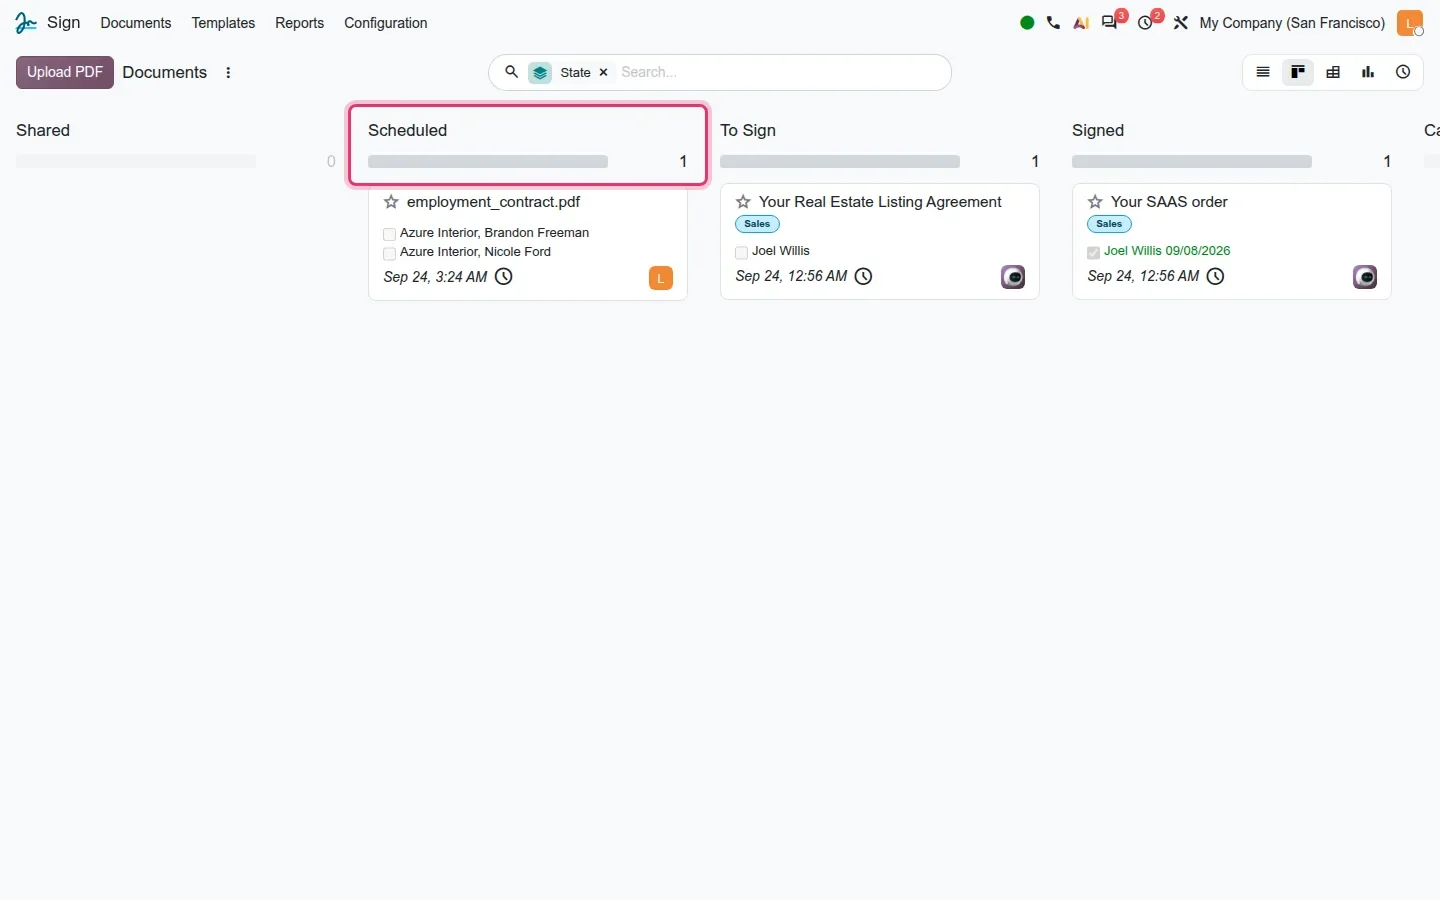
Sign > Documents opens a page titled Documents, as a list by default. Switch to the kanban view and group by State to see the full lifecycle side by side: Shared, Scheduled, To Sign, Signed, Cancelled and Expired. A scheduled card shows the document name, an unchecked box per signer and the planned send time with a small clock. The guide calls this view "All Documents grouped by state"; on the build the menu entry is simply Documents.
Odoo 20 also tightens several smaller workflow details. A partially signed document can be downloaded before the last signer is done. When you use Sign Now for your own signature, you can hand off the remaining signers by email from that dialog. Cancelled requests are visible in the portal. The thank-you dialog follows the signing order, so a signer sees who is next. And once a request email is sent, the email record is deleted to keep the database light. We did not exercise these on the demo, so read them as documented behaviour rather than as something we clicked.
The template editor: signers, fields and reordering
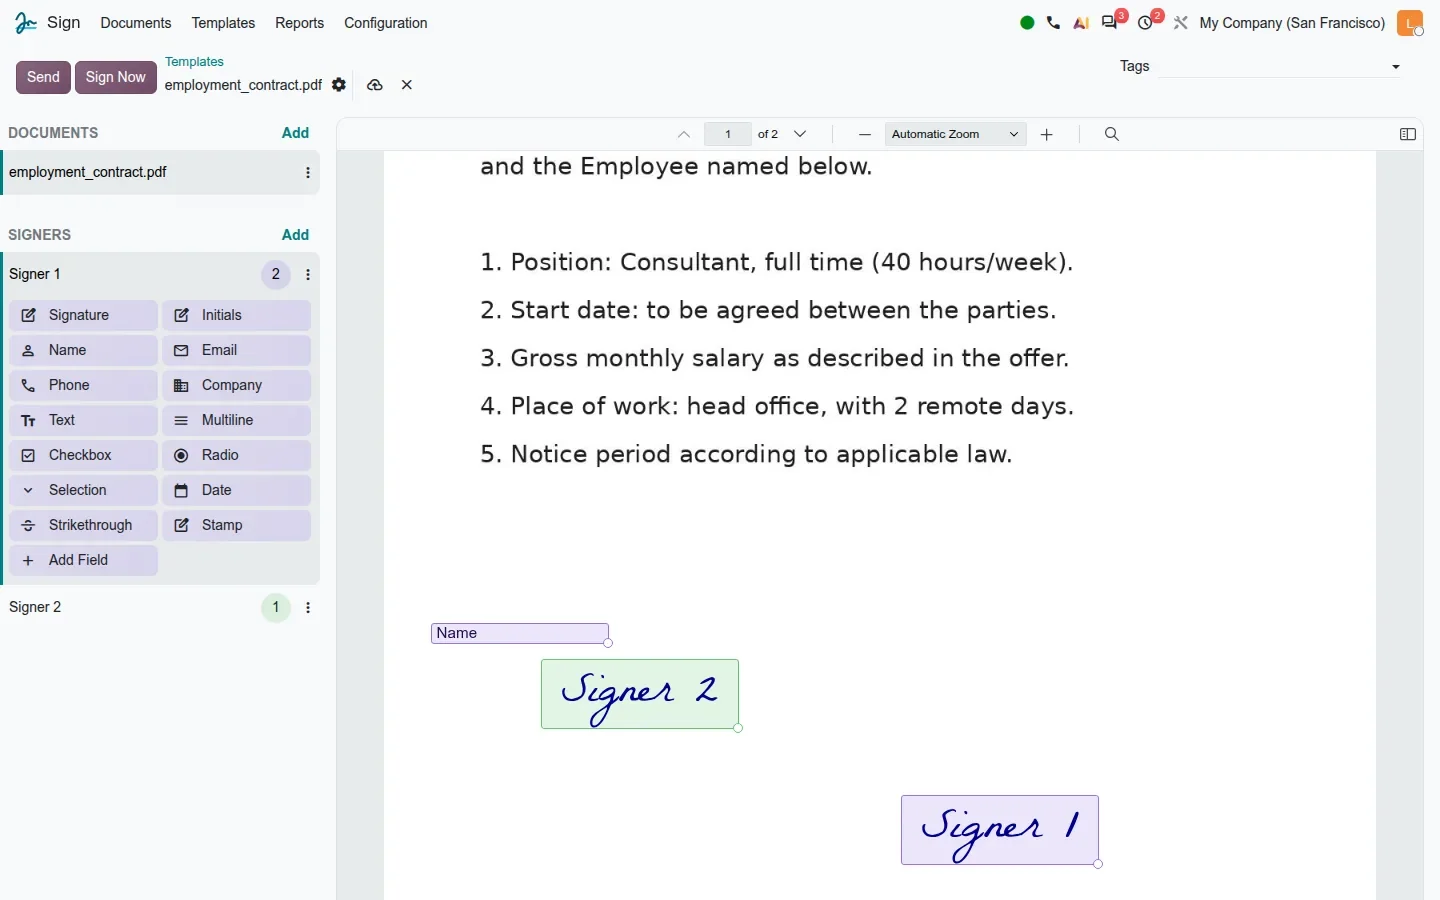
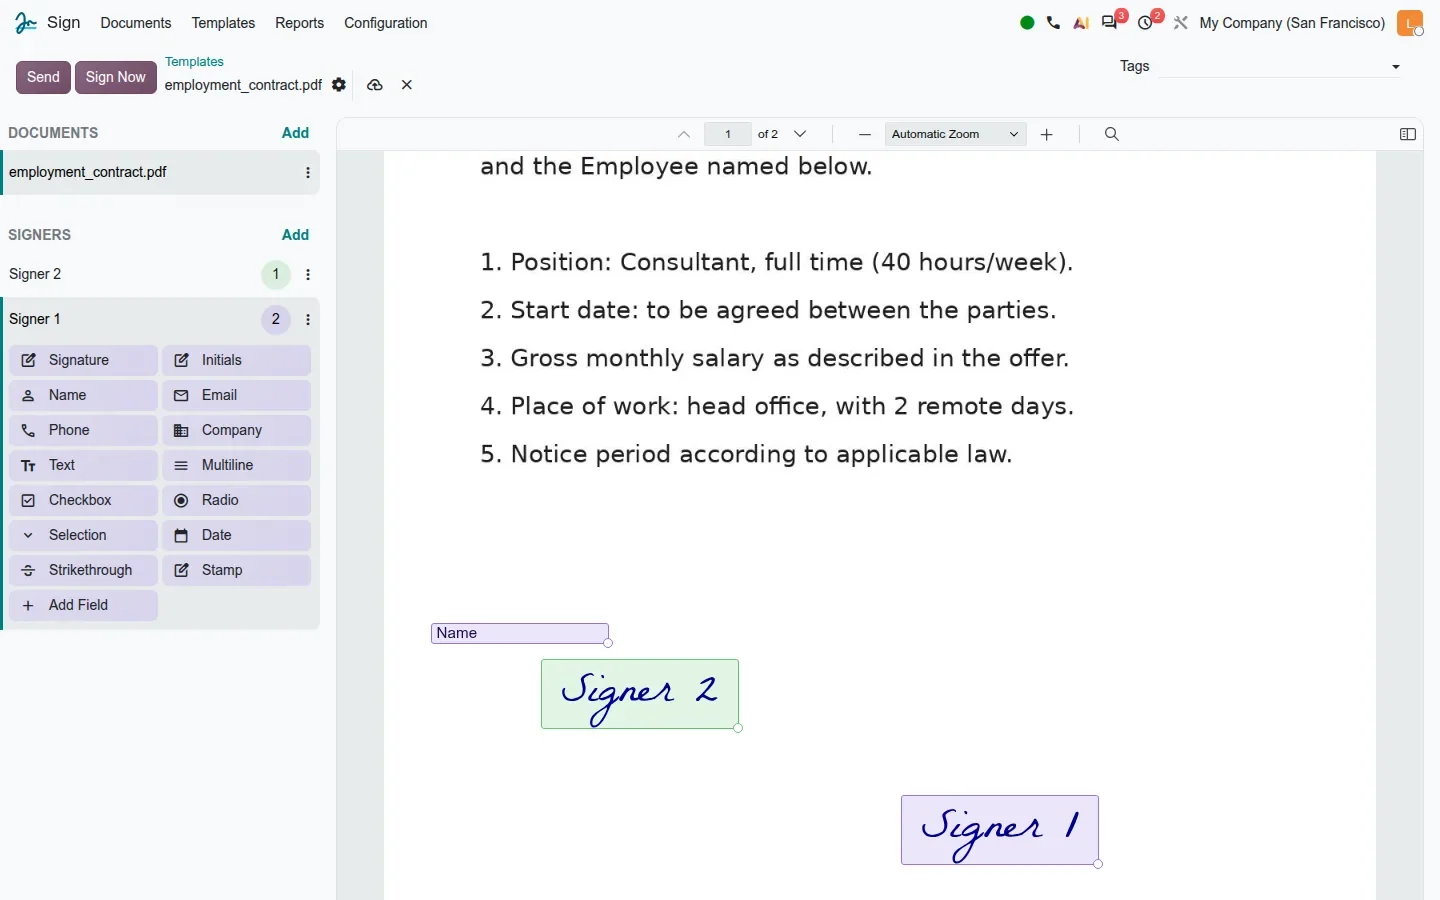
Sign > Templates > Upload PDF drops you into the editor. The left sidebar has three parts. Documents lists the PDFs in the template, with an Add button to bundle several files into one request. Signers lists the signer roles, each with a count of the fields placed for it. Selecting a signer reveals the field palette: Signature, Initials, Name, Email, Phone, Company, Text, Multiline, Checkbox, Radio, Selection, Date, Strikethrough and Stamp, plus an Add Field button to create a custom field without leaving the document. The top bar holds Send, Sign Now, the template name with a gear for its properties, and a Tags field in the control panel.
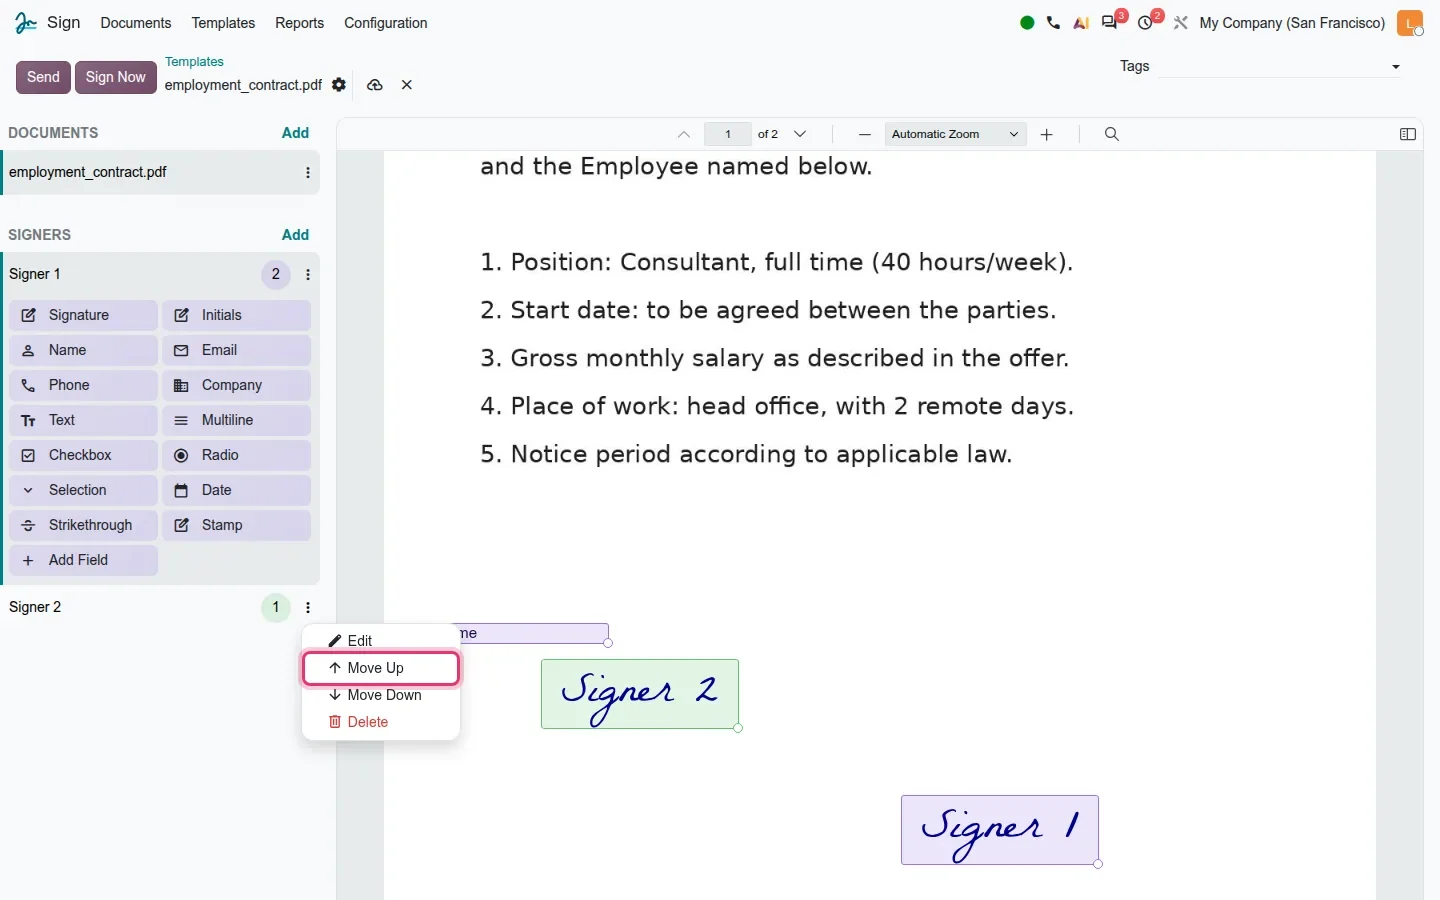
Reordering signers is done from the signer's menu, not by dragging. The vertical dots next to a signer open Edit, Move Up, Move Down and Delete. Choose Move Up on Signer 2 and the sidebar lists Signer 2 above Signer 1. That order becomes the sequence in which people are asked to sign once you switch on Signing Order in the send dialog, the usual requirement when a manager signs after the employee or a customer after the salesperson.
Two more editor changes come from the 20.0 changes we read but did not test: linked fields are synchronised in both directions, so filling one copy of a field fills every copy, and the template bundle can be renamed on the fly.
A mobile editor, non-Latin scripts and the signing certificate
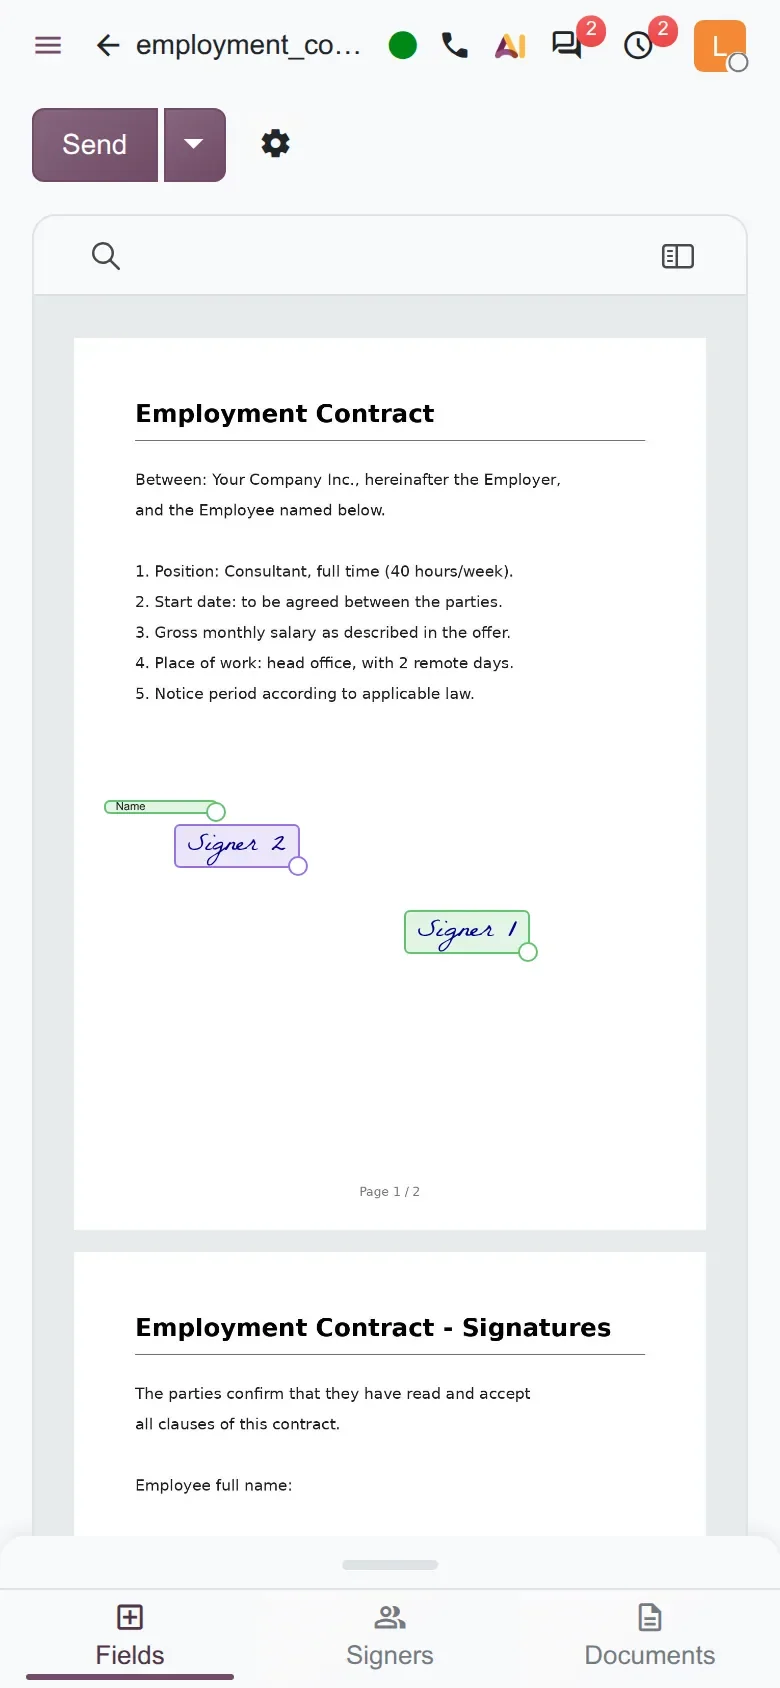
The editor now has a phone layout. At a 390-pixel width the sidebar disappears and a bottom bar with Fields, Signers and Documents takes its place; the Send button gains a dropdown, the gear stays next to it, and the PDF pages stack vertically. It is not where you will build a twenty-field lease, but it is enough for an HR manager on a tablet to add a signer and a signature box before a contract goes out.
Two changes matter for teams that sign in more than one script. Typed signatures and field values now render with non-Latin fonts, which addresses the garbled output that Arabic, Cyrillic, Greek and Asian scripts produced on the final PDF. And the style of the certificate appended to the signed PDF can be customised. The Settings page keeps the company signing certificate used to seal documents, under Cryptographic Signature with a Signing Certificate field that accepts a .pfx or .p12 file.
Finally, Sign talks to two other apps: the Salary Configurator can auto-fill contract values with Sign logic, and Spreadsheet can bulk export the answers collected in signed documents, covered in the reports and spreadsheets post of this series.
How to try it on a demo database
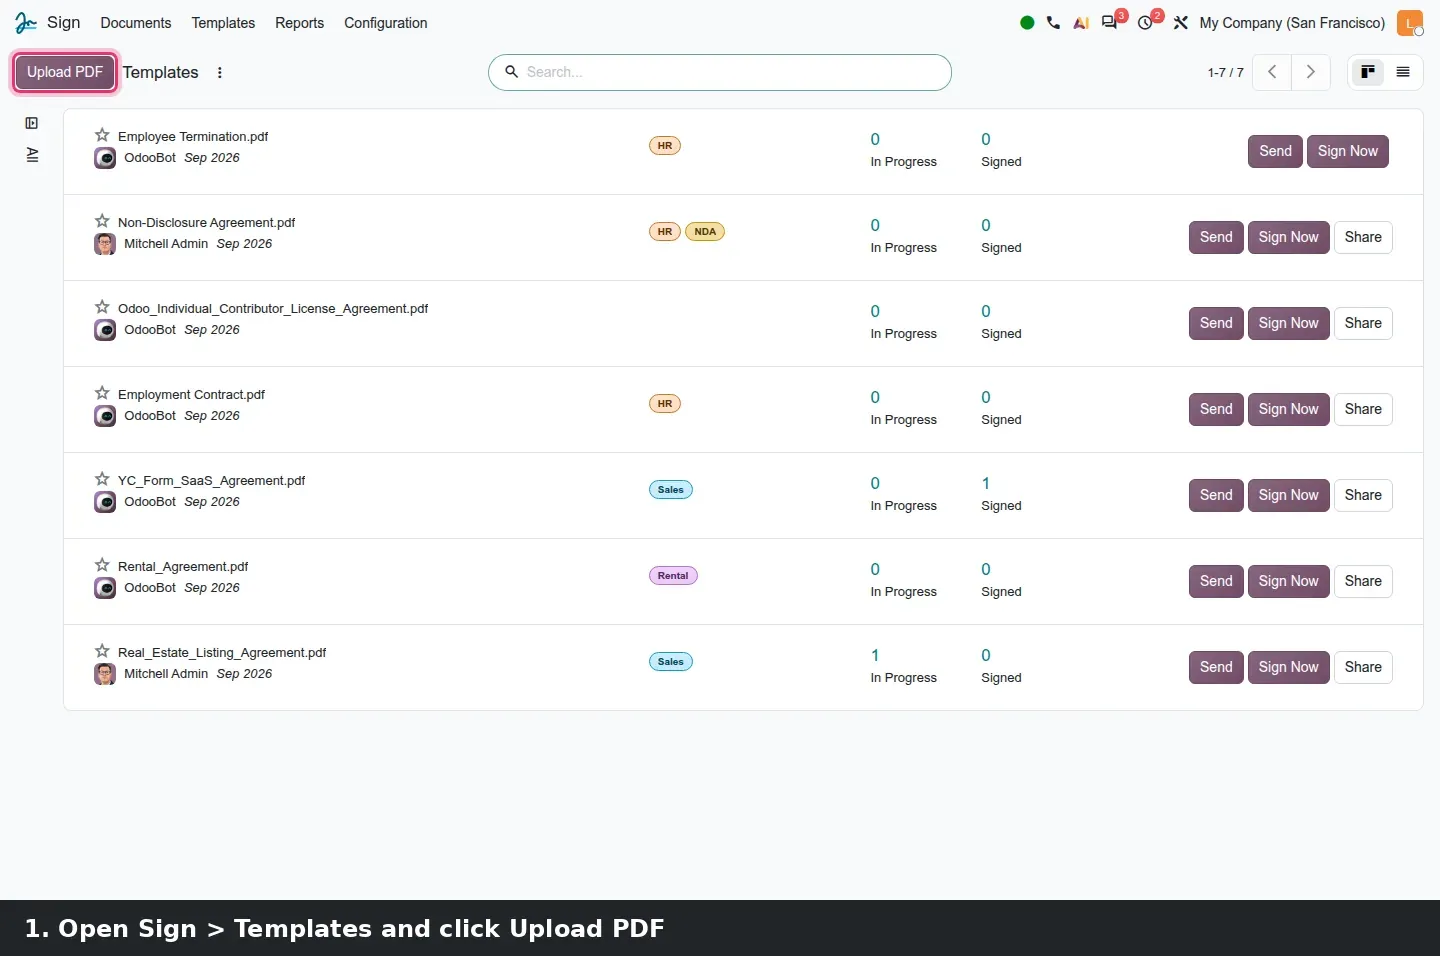
- On a 20.0 demo database with Sign installed, open Sign > Templates and click Upload PDF. Pick a short PDF with two pages.
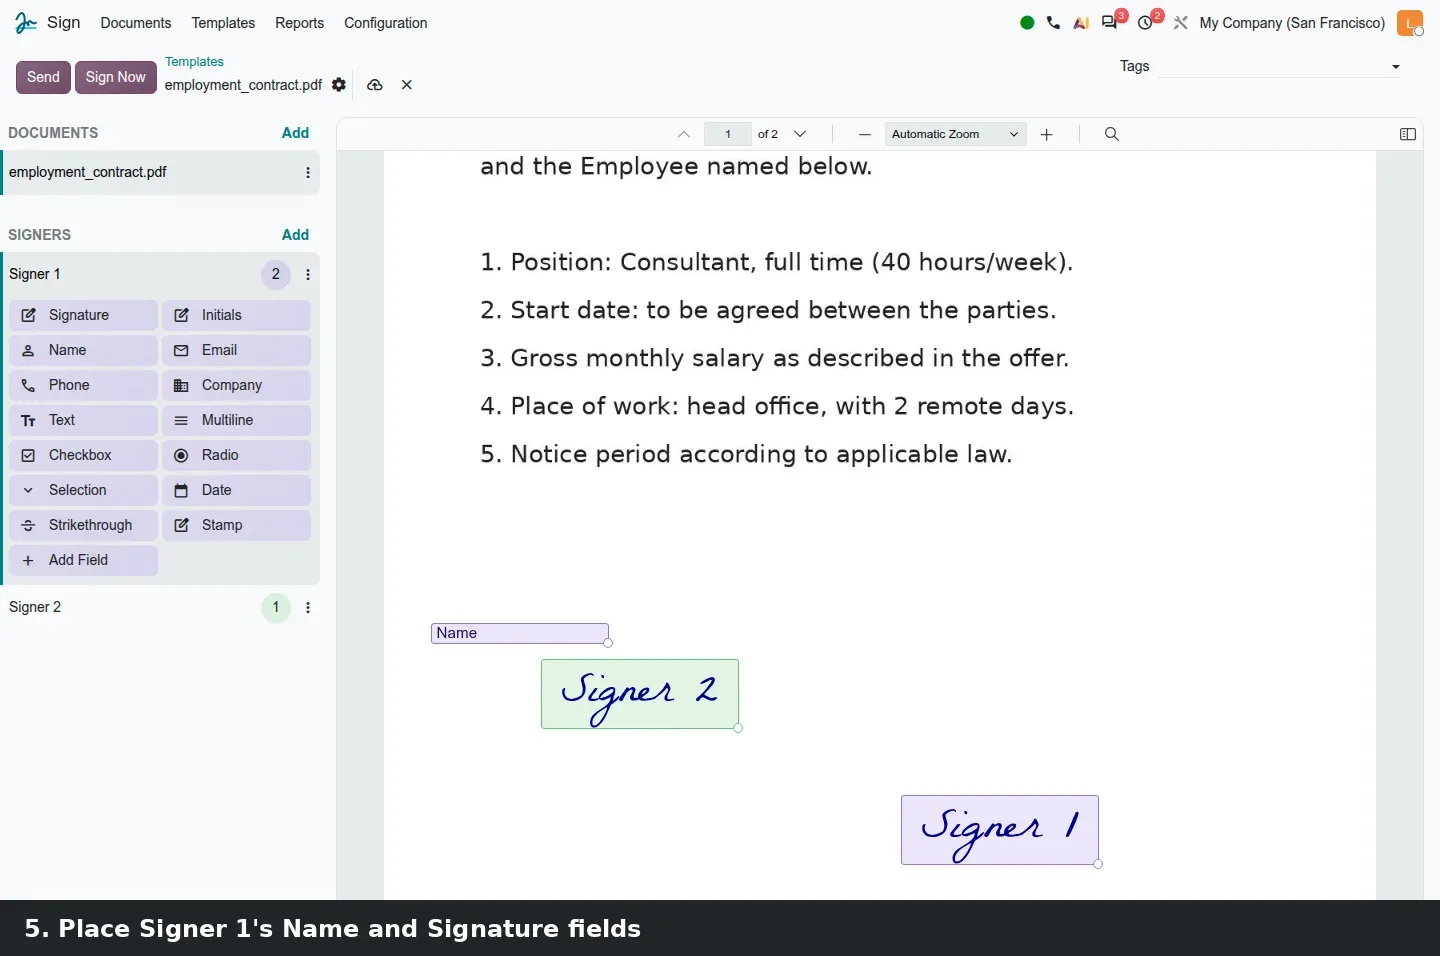
- In the editor, click Add next to Signers to create Signer 2. Select Signer 1 and drag Name and Signature onto page 1, then do the same for Signer 2.
- Open the vertical dots next to Signer 2 and choose Move Up. The sidebar now lists Signer 2 first.
- Click Send. Type a contact for each signer and switch on Signing Order if the order matters.
- Click the clock icon in the dialog footer, choose Tomorrow Morning and click Save. The Send button reads Schedule; click it.
- Open Sign > Documents, switch to the kanban view and group by State. Your request sits in the Scheduled column with its send time.
- For WhatsApp, open Sign > Configuration > Settings, tick Send Requests through WhatsApp, open Manage Your Templates and have the three templates approved by Meta.
What we could not verify on the pre-release build
The Send via WhatsApp button only appears once the three Sign WhatsApp templates exist and Meta has approved them; our demo had no Meta Business account, so we captured the setting rather than the button. We did not attempt the two-way sync of linked fields in the signing preview, nor a typed signature in Arabic or Greek on the final PDF. The smaller workflow changes (partial download, the Sign Now hand-off, cancelled requests in the portal, deletion of sent emails) are described from the 20.0 changes rather than from the demo. Everything else on this page was clicked through on the 20.0 Enterprise build of 23 September 2026.
What this means for an upgrade
If you are on Odoo 17, 18 or 19, your templates and signed documents carry over; what changes is how you send. Decide before go-live whether WhatsApp delivery is worth a Meta Business account and the template approval, and if you host Odoo yourself, add phonenumbers to your server before installing the WhatsApp app. If a CRM, HR system or script creates signature requests or fetches signed PDFs through XML-RPC or JSON-RPC, that integration is at risk in Odoo 20, for which Odoo has scheduled the removal of those endpoints, and belongs in an RPC migration audit. Rebuilding templates on a copy of your data and testing the send flows is part of our migration service, and the series hub lists the other changes that touch the same upgrade.
Frequently asked questions
Can Odoo 20 Sign send signature requests through WhatsApp?
Yes, if the WhatsApp app is installed and configured with a Meta Business account. Enable Send Requests through WhatsApp in Sign > Configuration > Settings, then create the three Sign message templates and have Meta approve them. The Send via WhatsApp button only appears after that approval, and the request keeps the same signing order and reminders as an email request.
How do I schedule a signature request in Odoo 20?
Click Send on a template, fill in the signers, then click the clock icon in the dialog footer. Set Scheduled Date offers Tomorrow Morning, Tomorrow Afternoon, Next Monday Morning or a specific time. After Save, the Send button reads Schedule and shows the planned moment; the request waits in a Scheduled state until then.
Where do I see requests that are scheduled but not yet sent?
Open Sign > Documents, switch to the kanban view and group by State. The Scheduled column sits between Shared and To Sign and each card shows the signers and the planned send time. A scheduled job moves the request to To Sign and sends the invitations once the date passes.
Can I change the order in which people sign?
In the template editor, open the vertical dots next to a signer and choose Move Up or Move Down; there are no drag handles on the pre-release build. The sidebar order then becomes the signing sequence when you switch on Signing Order in the send dialog.
Does Odoo 20 Sign handle Arabic, Cyrillic or Chinese signatures?
According to the 20.0 changes, typed signatures and field values now render with non-Latin fonts, which fixes the garbled output those scripts produced on the signed PDF. We did not test it on the pre-release build, so confirm it on your own database with a real document before you rely on it.